For many guys looking for that clean bald look, clippers and even standard razors just aren’t good enough. For the smoothest and all-around best shave without the complexity of breaking out a straight razor, shaving your head with a safety razor is where it’s at.
It makes sense given the sharpness of the razor being able to get your cut down to the skin while the guide makes sure you’re not going to slice yourself open if you aren’t perfect. It’s the best of all worlds when done right. But that’s the key, right? This is an introduction to a safety razor for many and it can be a little intimidating at first.
Shaving Your Head With A Safety Razor Takes Patience
Let me kick off the advice with a note: This will take practice. Your first shave isn’t going to be perfect and that’s alright. This is a manly-man skill and getting it to the point where you look like Mr. Clean each and every time takes time and patience. Rushing will only leave you cut up, patchy and razor burned, so slow it down.
Without further ado, let’s get down to the nitty gritty and teach you how to begin shaving your head with a safety razor.
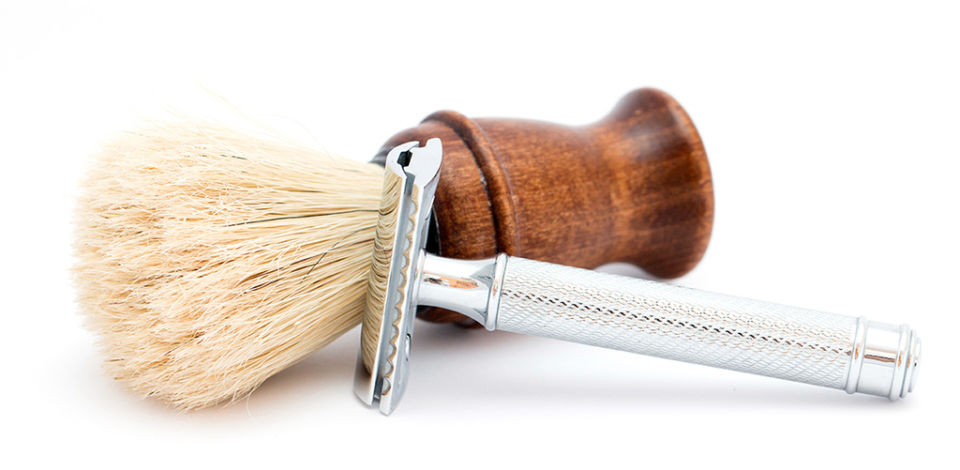
1) Getting the right equipment

This can really be the most intimidating aspect of shaving your head with a safety razor. There are a million different razor handles, blades themselves and enough accessories to put you in the poor house. Here’s a quick checklist for what you’re going to need to get this to work:
- Razor handle
- Razor blade
- Shaving cream
- Shaving brush (optional)
- Soap puck (optional)
- Shaving soap bowl (optional)
- Washcloth
- Towel
- Sink full of warm water
- Bowl of ice water
- Aftershave or balm
You’re likely already freaking out wondering what razor you should be buying in the first place. Razors for black men, razors for men with thinning hair and razors for men with coarse hair are all very different. Luckily, we’ve gone through everything and helped get you the best razor for shaving your head. But if you already have one you got, don’t fret -- It’ll likely work just fine and you can always shop around for the ones you like best, especially razors that prevent ingrown hair.
Now that you have your razor blade and handle, it’s a matter of finding a good shaving cream or shaving soap. You can always stick to the typical shaving cream you’ve used and you’ll be just fine but we’ve also done the homework and picked out some of the best shaving creams on the market for you too.
If you want to get fancy, go old-school barber style and bust out some shaving soap, a shaving brush and work up your own lather, you certainly can. We’ve broken down the best specific shaving soaps that are easy to get into a rich, thick lather, offer a good scent and have moisturizers built in to keep you looking fresh and bump-free.
The key here is all of your stuff should be in good working order. Your handle should be firm, not coming apart and sturdy in your hand. Your blade should be sharp . . . seriously sharp. If you’re not sure if your blade is still good, put on another one. A dull blade is the quickest way to hurt yourself and will give you a crappy shave automatically.
2) Prepping your head
Before you ever take a razor to your head, you’re going to need to prep the area. That means getting the hair trimmed down a good deal already so you’re not trying to chop everything off. Think of your face on this one to get a good idea of where you should be at.
You wouldn’t take a razor to a beard you’ve been growing out for the last year. It’ll pull hair out and just be an absolute mess to work with. First, you take some trimmers and get the hair down as close to the skin as possible. It’s the same with your head, so break out the clippers and buzz all your hair as close as your trimmers will get it.
3) Shaving your head with a safety razor is all about the lather
The shaving cream or shaving soap might be the most important factor in shaving your head with a safety razor properly. If you’re using canned shaving cream, you’re going to be alright automatically. If you wanna step that up and get into shaving soaps with certain oils or moisturizers in there, you’re going to need to take some time to get a proper lather going. That’s not a hard process but it takes some time in its own right.
We’ve broken down, step-by-step on how you turn that cup of hard soap into a great shaving lather. It involves using the proper amount of water, properly soaking your brush to start with and working it like you’re a pastry chef making your own whipped topping.
If you’re using canned shaving cream, this step will actually come third. If you’re making your own, you should really be doing this now so you can get your face prepared right before you shave.
4) A hot soak is important for a good shave with a safety razor
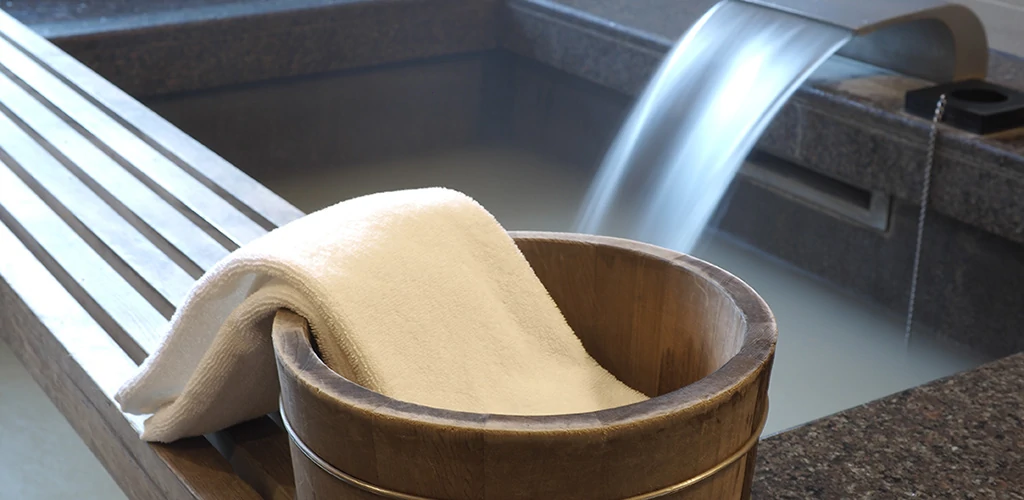
If you’ve ever seen a film or television show where someone gets shaved at the barber, you’ve absolutely seen the hot towel treatment before anything gets applied. This isn’t just to help calm down the person in the chair but offers real value in the shaving process.
The hot towel softens the hairs and gets them to stand up. That means less wear and tear on the blade itself and an easier time cutting through each hair. While you’re using a razor blade already, every time the blade gets caught on the hair even a little bit, the more it automatically pulls. Those microscopic pulls and hesitations are what helps to cause razor burn and irritation. If you’ve ever had a bad case of razor burn, you can attest to it downright hurting in addition to making you look like a kid going through puberty.
Take a washcloth and soak it in hot water in the sink. Be reasonable about the temperature but it should be just about as hot as you can really take. Once you have the washcloth all soaked, wring it out to the best of your ability and sit it over the area you’re going to be shaving. That might mean you need to lean back on your toilet for a few minutes.
After about 2 minutes or so, take a little of your shaving cream and apply it to the area you’ll be shaving. Repeat the hot towel process over again for another minute or two before using it to clean yourself off. Now you’re ready and can apply a generous helping of shaving cream to your head where you plan on shaving.
5) A slow hand is necessary when shaving your head with a safety razor
You’re not using a disposable razor with a swivel head and 7 different razors attached. Waving this thing around your head like some cartridge razor is going to slice you up no matter how safe your safety razor claims to be. Remember, an actual razor blade is attached to this thing and it’ll cut you to the bone if you so much as think about it wrong.
There’s no fear though because the head of the safety razor does offer some serious protection if you take your time and focus on the angle you’re shaving at.
I like to start in the direct center of my head and work forward to the middle of my forehead on this first pass. It gives me a good starting point and allows me to center myself with the blade. At a 30-degree angle, slowly drag the razor against the skin, allowing it to follow the contours of your head. You’ll use a little force but shouldn’t really be pressing it into the skin -- it’s more of a firm hand than pushing in.
One thing every guy tends to do when shaving is to take long swipes. From the center of your head to the middle of your forehead will be roughly two or three actual swipes. Get about half of it done and turn your razor over to the other side if it’s double-sided, or rinse it off if it’s not. You don’t want to do too long of a swipe or the razor blade will get bogged down with hair and the last half of your swipe will be a bad cut.
This is where patience comes in. Don’t rush it when you drag the razor and don’t feel like you have to get it all done right this instant. By taking shorter passes, your blade stays clean and sharp all the way through.
A quick note: Absolutely do not go back and try to clean anything up here and don’t go over areas without shaving cream. You’re going to give yourself razor burn that way.
6) Cleaning the razor
Much like any razor -- disposable, cartridge or safety razor -- cleaning your blade is vital to a good shave. Things don’t really change when cleaning a safety razor, which is the great thing about it.
With your sink full of warm water, simply stick the razor into the sink and swish it around for a few seconds. Pull it out and look at it. Is there still hair stuck to it? If so, stick it back in and swish until it comes out clean.
7) The back of the head is the most difficult
You’ve done the front half of your head and now you’re on the backside where you can’t see anything. So how do you do it? It’s not as hard as you think, you’ll really just be using the same process as the front, albeit in reverse.
You’ll start at the base of the neck and work your way directly up the middle of the head to the center where you started on the front side. Again, let the blade simply follow the contours of the skin. Depending on how your head and neck are shaped, you might need to lower your head to pull the skin taut here but you’ll get a good feel pretty quickly for what you need to do.
By having the shaving cream on your head, you should be able to flat out see where you’ve already shaved on the top of your head. By starting from the back and pulling forward, you’re making it easy to follow where you’ve been.
Going around the ears can be a little tricky as well, pull using your other hand to pull them forward and fold them onto themselves will allow you to get behind them easily. Just follow the contour of the ear in that semicircle when you’re right against it and you’ll be fine.
8) Multiple passes are the only way to go
Remember when I said you weren’t to go over an area again before? That’s because you’re going to be doing multiple passes. This will not only help you get everything you might have missed the first time around but get it from different angles to get closer to the skin.
You’ll re-apply the shaving cream to your head and go the opposite way. Depending on how your hair follicles flow, that might mean doing the polar opposite of what you just did or turning it 90 degrees and going sideways. This is where practicing is critical as you’ll only find out when you’ve done it before.
9) Clean up with an ice bath

Your skin is pissed off right now, no matter how gentle and careful you were. This is again dependent on your skin type but it could be anywhere from perfectly fine to a little puffy and pink. This is where the ice bath comes in at.
Just like professional athletes after the game, you’ll be using cold to reduce swelling.
You have your bowl full of ice water and can soak your washcloth for a minute in it. Wring it out and apply it to the area you just shaved. Leave it there for a few minutes and when you go to take it off, use the washcloth to clean up any excess shaving cream. Rinse it out and repeat the process again with the cold washcloth.
10) Aftercare is the final step of shaving your head with a safety razor
You’ve gotten a close shave, reduced any razor burn or swelling with the cold washcloth. Now it’s time to protect the skin even further with a little aftershave, post-shave balm or moisturizer.
Like so many things regarding skincare, this is all on you here. There are a million skin types of varying sensitivity, so you’ll only be able to decide what your skin needs following a shave. Ideally, it should be the same thing you use on your face but it might not be. We’ve broken down all the different best products for what to put on your shaved head, so you can pick the best of the product type you’ll need.
You’ve successfully shaved your head with a safety razor. Like I said at the beginning of the article, this is going to take a few times to perfect. But as long as you’re patient, use the right tools and follow these steps, you’ll find the perfect routine for your head. And then you’ll have that smooth, clean bald look without any knicks or razor burn to get the ladies swooning.
When you purchase through links on our site, we may earn an affiliate commission. Here’s how it works.